
How To Setup Google Optimize With Nuxt
The path to a great user experience is often a tale 100 failures and good old fashioned grit. Sure the site looks amazing now, but you should have seen the trainwreck it was 2 years ago!
It takes a herculean effort to make a great site. You have to form theories and test their solutions individually which takes a substantial amount of time and patience.
The process is called A/B Testing or Multivariate Testing and there are a lot of great tools on the market. One of the most popular ones is Google Optimize.
Hold Up, What's A/B Testing Again?
Since this post isn't diving into A/B testing itself, here's the short and skinny. To improve your site experience you create 2+ different experiences and split your traffic so that some get the old experience and some get the new experience so you can compare your metrics. Here's more info.
Do You Need A/B Testing?
You may want to leverage A/B Testing if you:
- Have changes you are worried may have risky consequences
- Have a marketing or e-commerce site
- Want to improve your user experience
So What's Google Optimize?
Google Optimize is an A/B Testing tool. With a little JavaScript snippet, it lets you make changes to your site with a visual editor, split the traffic to the appropriate audiences and analyze the results automatically. This is all done client-side.
Problem #1 - Client-Side Performance
Yes, all this is magical and easy. But it comes at a cost; performance.
Since experiments are all client-side that means there is a delay from the time your site loads to when the experiment is loaded. Many times this can cause page jank or obvious changes right in front of your users.
For example; while the user is looking at the page they see a blue button change to an orange button. Not only is this annoying, but it could also contaminate your test results. Of course the customer noticed the new experience, it changed right in front of them!
There are some workarounds Google has up its sleeves. One method is to show a quick loading screen that blocks the site until the experiment loads. This is far from ideal.
I should mention, all client-side A/B Testing tools suffer from these problems.
Problem #2 - Complex or Large Tests
Assuming you are using Vue for your site, you likely have components, helpers and integrations that you may need to produce an experiment. None of that is available using a third party testing tool.
A real example; marketing wanted to test if showing sub-categories on our category pages was more effective than showing products. This involved 5 top level category pages with about 60 sub-categories. There is no way in hell we could use a third party visual editor to pull this off. It would be way too much effort, too complex and would be very fragile.
What we needed was a way to run the experiment while still being able to leverage the rich ecosystem we already had. We had the data, the components, and the themes. If only we could just run the experiment ourselves.
Server-Side Experiments
You can run your own experiments! In Google Optimize these are called Server-Side Experiments. Now you are responsible for splitting traffic, keeping track of experiment assignments and rendering the different experiences. The only thing Google Optimize does is keep track of the metrics you are measuring and provide analysis.
This can seem a bit daunting. That's a lot of stuff that you are responsible for now. Fear not! With a handy Nuxt library you'll have all the tools you need.
Step 1: Setup Google Analytics
Before we go any further, you need to make sure Google Analytics is installed.
You have two main options:
- analytics.js - This is the standard Google library.
Make sure the plugin is above your Nuxt Google Optimize Plugin, this is because when the optimize plugin initializes, it needs ga() to be available. - Nuxt Analytics Module - A Nuxt wrapper for Google Analytics.
Make sure this module is below the Nuxt Google Optimize Plugin. This due to the way modules inject plugins (unshift). Also keep in mind with this configuration your first page hit won't report your experiment assignment.
Here, I'm using analytics.js inside of a nuxt plugin. Just replace the XXX with the code you find from your Google Analytics instance.
export default ()=> {
  (function(i,s,o,g,r,a,m){i['GoogleAnalyticsObject']=r;i[r]=i[r]||function(){
    (i[r].q=i[r].q||[]).push(arguments)},i[r].l=1*new Date();a=s.createElement(o),
    m=s.getElementsByTagName(o)[0];a.async=1;a.src=g;m.parentNode.insertBefore(a,m)
    })(window,document,'script','https://www.google-analytics.com/analytics.js','ga');

    window.ga('create', 'UA-XXXXXX', 'auto');

    // send the first page hit after you are assigned the experiment
    setTimeout(function(){ window.ga('send', 'pageview'); }, 1000)
}
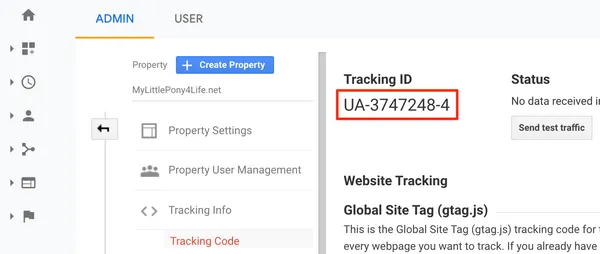
How To Find Your Google Analytics Id
Log into GA, click Admin, select your property, click Tracking Info, click Tracking Code. Copy and paste the ID you see into the code above.
Step 2: Setup Google Optimize
Follow this guide to setup Google Optimize for server side experiments.
Step 3: Setup Nuxt
Since we are using server-side experiments, we'll have to keep track of running tests, audience splitting, and allocation. Thankfully the Nuxt Google Optimize Module does all of that and more!
Install The Nuxt Google Optimize Module
yarn add nuxt-google-optimize
export default {
  mode: 'universal',
  modules: [
    'nuxt-google-optimize'
  ],
}
Update Your Layouts
Add this code to the layouts you'll be running experiments on. It adds a class name based on the experiment and variant you are assigned! This is crazy useful for styling variants.
<script>
export default {
  head() {
    return {
      bodyAttrs: {
        class: this.$exp.$classes.join(' '),
      },
    }
  },
}
</script>
Here you can see I was assigned the big-button experiment, variant 1.
<body class="exp-big-button-1" data-n-head="%7B%22class%22:%7B%22ssr%22:%22exp-big-button-1%22%7D%7D">
Setup Your Experiments Folder
Next, we'll setup a couple folders and files for our first experiment. Off the root of your project, create a folder called experiments. Add these files:
import bigButton from './big-button'

export default [
  bigButton
]
 .exp-big-button-1 button {
  @apply text-xl p-5 px-6;
}
import './styles.css'

export default {
    name: 'big-button',
    experimentID: 'XXX', // replace with your experiment id

    variants: [
      { weight: 50 }, // 50% traffic
      { weight: 50 }  // 50% traffic
    ],
  }
When you are done, it should look something like this:
/experiments
  /big-button
    index.js
    styles.css
  index.js
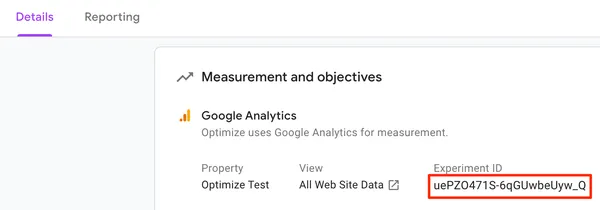
How To Get Your Experiment Id
To find your Experiment Id, go to your experiment, click the details tab, and scroll down to Measurement and Objectives.
Step 4: Setup Your Target Object
Now that we have the environment setup, it's time to make our button.
<template>
  <div>
    <button class="bg-blue-500 hover:bg-blue-700 text-white font-bold py-2 px-4 rounded">
      Sign Up!
    </button>
  </div>
</template>
Step 5: Verify Your Experiments Locally
You should be able to test your experiment now. Even if you have Google Optimize (The Service) setup wrong, you should still be able to see your 2 experiences locally.
Open multiple Incognito windows until you see 2 different buttons.

Step 6: Start Your Experiment
Go to Google Optimize, and press the Start button inside your experiment.
Note: Only do this when you really expect to start collecting results. If your experiment doesn't get at least 1 hit per variant per day, you'll have to stop your experiment and create a new one!
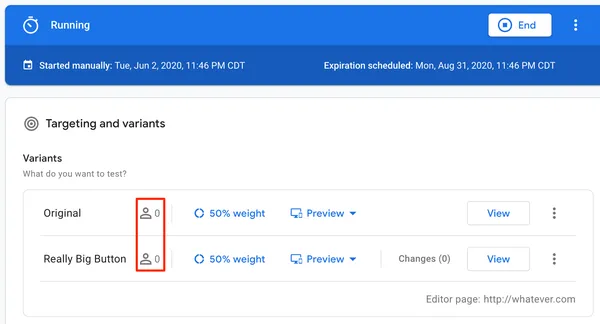
Step 7: Verify People Are Hitting Your Experiment
Depending on the amount of traffic you get, you should see visitors assigned to one of your two variants in real time.
If you'd like to test the experiment allocation locally before pushing your code live you can! You have to set up a fake domain using your hosts file as Google Optimize won't record hits to localhost or 0.0.0.0. The experiment in Google Optimize still has to be running to see you.
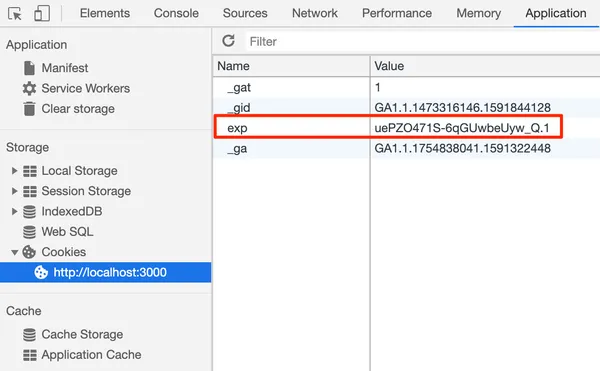
What Experiment/Variation Am I Assigned?
Experiment and variant allocation are kept track of through a cookie called exp. The pattern is experiment.variant. Usually a variant of 0 is for your original experience and 1+ are for your new variants, but the allocation is up to you.
When Do I Stop An Experiment?
Don't worry. Google will tell you when to stop an experiment and what to do next.
Fun fact: Google may tell you to give up on an experiment (when no clear leader is found) but then change its mind the next day when it has more data if you let the experiment run longer. My take is to just give up when it tells you to and never look back ;)
Conclusion
As you can see it takes a lot of work to setup Google Optimize with Nuxt, but trust me it's well worth it. Once you have everything setup, creating new tests really easy.
I've been testing for 5+ years now and you wouldn't believe the crazy things I've discovered! It really makes a difference and it's well worth it.
That's all for now, keep testing ;)